Translator

Thursday 27 October 2016

Happy Halloween


Hi fellow bloggers, thanks so much for stopping by today to see my DT post for Craft Consortium. My card today showcases this super Decoupage Paper called Distressed Wood and I thought it was the perfect background for my Halloween card.


I love the versatility of the decoupage papers and on my card I mounted my Decoupage paper onto cardstock with Mod Podge , tattered at the edges and added some purple Distress ink.


My spikey flowers were made using the Kori Kumi Die Cut Flowers and adding some of the leaf ribbons. 

Thanks so much for stopping by today and please checkout Craft Consortium to see their vast range of stunning embellishments, paper pads and Decoupage papers on Facebook for inspiration and regular giveaways, you will also find them on Pinterest, Twitter and Instagram.

Happy Halloween, 
Julie x    

Craft Consortium Products Used:

Wednesday 26 October 2016

With Love


Hi everyone, today for my DT card at Cheery Lynn Designs I am sharing some inspiration for an Autumnal card.


I started by die cutting out my stacker dies, tattering some at the edges with the blade of my scissors and layering up with foam strips.


My Sunflower Doily I layered two colours, offsetting and gluing only in the middle so my layers were not lying too flat.


I added a Winter bouquet of foliage and a Sunflower, apt for this time of year. My berries have Glossy accents added onto them. 


My Sunflower was shaded with Distress inks adding Flower Soft and Micro Beads to the centre.


I finished off my card with bling around my sentiment.

Thanks so much for stopping by today and good luck to everyone entering the Bi-Weekly challenge at Cheery Lynn Designs.

Crafty Hugs, 
Julie x

Shop at Cheery Lynn for:

Wednesday 19 October 2016

Tea for Two - Mixed Media Project


Hi everyone, for my DT post with Craft Consortium this week I decided it would be fun to alter an old unloved teapot I picked up in a junk shop with this beautiful decoupage paper called Tea Party.

I started by ripping my paper into approx 2 inches roughly in diameter and glued onto my teapot with Mod Podge.


Once all dry I added a thick layer of Decoart Crackle Glaze and let it thoroughly dry and the magic of crackles appear. I then rubbed in some Decoart Antiquing cream to highlight my crackles and sealed with a gloss varnish.


I love how the crackles look like crazed porcelain.


My tea for two was stamped adding a couple of Craft Consortium's Resin Roses which I had pressed into my Versamark ink pad and heat embossed with Frantage powder, I love the shabby feel of them to compliment my teapot.


At this point I decided I needed a teacup to go with this so decided to upcycle  an old family porcelain teacup that was passed its best for holding tea.


I used the same techniques as on my teapot, I also painted my handle and rim with some gold alcohol ink. Finishing with some lace and fussy cut butterflies which I added a layer of gloss varnish to.


I do hope you feel inspired to upcycle an item with Decoupage.

This is my second post today so please scroll down to see my Festive card.

Please do check out Craft Consortium to see their exquisite range of Decoupage papers, stunning embellishments and paper pads on Facebook for inspiration and regular giveaways, you will also find them on Pinterest, Twitter and Instagram.

Thanks for stopping by again today.

Crafty Hugs, 
Julie x 

Craft Consortium Products Used:


Merry Christmas


Hi everyone, today for my DT card at Cheery Lynn Designs I am showcasing some of their fabulous Christmas dies on my Festive Vintage styled card.


I started by layering up several of my stacker dies with foam strips between some layers and glued flat on others. My gold edging was created by rubbing my die cut on my Versamark ink pad and heat setting Gold Embossing Powder.


My Holly Flourish and Sentiment were also heat embossed, adding some red bling to look like berries. I love the size of this sentiment as it makes a great feature on your card.


My Poinsettia's were cut out in cream cardstock inking at the edges and adding Gold Flowersoft to the centres. I mounted onto my card with some foliage.

Thanks so much for stopping by today and I hope you feel inspired to start making your Christmas Cards. Good luck to everyone entering the Bi-Weekly Challenge at Cheery Lynn Designs.

Craft Hugs,

Wednesday 12 October 2016

Sweet Kisses


Hi fellow bloggers, thanks for stopping by today to see my DT post for Craft Consortium using Santoro's Kori Kumi collection.


On this card I have used the 3D Decoupage sheets. The characters sit on a dandelion in their design but I decided with the TV programme The Bake Off back on our screens these characters would look super cute sitting on cupcakes. 


So I fussy cut around the flower adding some Stickles to both characters and placed on my die cut cherry cupcakes.


My background I used the coordinating papers in the range adding some more Stickles and die cut flowers to give depth and more interest to my muted background.

Thanks so much for stopping by today and please checkout Craft Consortium to see their vast range of stunning embellishments, paper pads and Decoupage papers on Facebook for inspiration and regular giveaways, you will also find them on Pinterest, Twitter and Instagram.

Crafty Hugs,
Julie x

Craft Consortium Products Used:
Kori Kumi Santoro Range-


Monday 10 October 2016

Halloween Trick or Treat Fun


Hi everyone I hope you had a lovely weekend and managed some creative time. Today for my DT card at Cheery Lynn Designs I am sharing some more Halloween inspiration using many of the amazing Halloween dies that Cheery Lynn have.


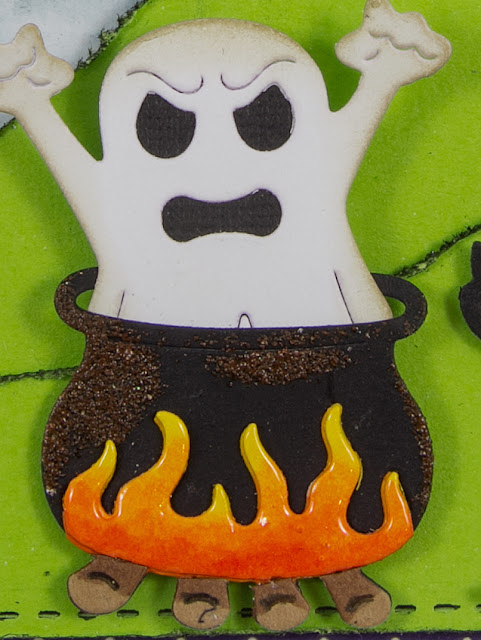
My Witches Cauldron was cut out in black cardstock adding some Vintage photo Distress powder at the edges to give a rust effect. My flames and logs were cut out in White cardstock and coloured with Copic pens adding some Glossy Accents onto the flames.


My cute little Witch was cut from the Trick or Treat Border layering her with a foam pad.


My hills were die cut from my Stitched stacker die, I then fussy cut the shape of hills and highlighted the stitching effect with a black pen, distressing the edges and adding some black soot Distress ink.


My house I layered Orange cardstock behind to give a warm glow, layering on with foam pads and a spooky ghost behind. My stormy sky was created with inks and a cloud stencil.

Thanks so much for stopping by today and I hope I have inspired you to create a Halloween scene on a card or Scrapbooking page. 

Good luck to everyone entering the Bi-Weekly Challenge at Cheery Lynn Designs for a chance to win a $20 spending spree.


Crafty Hugs, 
Julie x

Shop at Cheery Lynn for :


Thursday 6 October 2016

Decoupage Christmas Table Decoration


Hi everyone, thanks for stopping by to see my latest project for Craft Consortium using one of their beautiful Festive Decoupage papers. This one is called Blue Snowflakes.


My paper mache tray measures approx 10" x 4" and I thought would look great as a Festive table Decoration.


I started by giving it a coat of Gesso so the vibrancy of my snowflake wasn't lost on the brown paper background.


I tore my paper into pieces and glued in place all over my tray sealing it with another coat of glue.


Next I heat set some Embossing powder around the edges and added some Crystal shaded Stickles onto my decoupage snowflakes for added sparkle.


My die cut snowflakes were embossed with complimenting shades of embossing powders and layered up. I finished by adding some extra strong tape around my tea lights and rolled in a clear glass glitter for even more sparkle.


Thanks so much for stopping by today and please checkout Craft Consortium to see their vast range of stunning embellishments, paper pads and Decoupage papers on Facebook for inspiration and regular giveaways, you will also find them on Pinterest, Twitter and Instagram.

Crafty Hugs, 
Julie x


Craft Consortium Product Used:

Tuesday 4 October 2016

Happy Catoween


Hi everyone, gosh I can't believe we are into October already and Halloween shall be here very soon. So today for my DT card at Cheery Lynn Designs I am sharing some Halloween inspiration. I so love making these fun cards with all these fab dies.

I started off with an 8" X 5" card and matted and layered cardstock which I tattered at the edges. For my background I used inks and a web stencil to get a spooky effect, layering up my spiders web with foam strips.


My main cat I added the witches hat to, layering on the belt and buckle twice for added texture. I used the reverse side of my smaller cat on the left hand side of my card to give a mirror image. You don't tend to notice as much you have used the reverse side in black cardstock when you want your die cut facing the other way.


Frankenstein was cut out in several colours layering him up and highlighting his face and clothes with a Fine Liner pen.


My Skeleton I shadowed with black cardstock to help him pop.

I do hope you have enjoyed my post and feel inspired to make a Halloween Card. Thanks so much for stopping by today and good luck to everyone entering the Bi-Weekly Challenge at Cheery Lynn Designs for a chance to win a $20 shopping spree. 

Crafty Hugs,

LinkWithin

Related Posts Plugin for WordPress, Blogger...
01 09 10