Translator

Saturday 29 November 2014

Holidays are Coming

Click to Enlarge

Hi Everyone, hope you have all had a busy and creative week of festive crafting.

This week for my Cheery Lynn Designs DT Post I decided to keep my design flat on my Christmas card to demonstrate how you can still get lots of interest  and the illusion of depth onto a card. At the same time being able to put in an envelope for ease of posting.


My 2 base layers were cut out using my stacker dies. I went around the edge of my patterned paper with my distress tool and added a little ink and stickles around the perimeter. My Santa image I also used my distress tool at the edges.


My image I used a little Frantage on and added onto my die cut frame along with some more Stickles.


My Reindeer were cut out in the same brown card as my frame and a maroon coloured card. I glued them together offsetting them slightly to give a shadow effect.


Finally scattering some die cut snowflakes all over my card. You will notice I have put some partly under the frame and others on the top, this also gives an illusion of depth.

Friday 28 November 2014

Birds of a Feather

Click to Enlarge

Hello my fellow blog friends, thanks for stopping by to see my DT post for A Vintage Journey.

Chris is hosting our latest challenge called Birds of a Feather, which runs for 2 weeks. Please pop over HERE, where you will find all the details on how to enter this challenge and see some outstanding creativity.

For this challenge I was inspired by Tim to use cardboard on my project after him using this on his November tag. Let me take you through the process of making my wall hanging which measures just under 15 inches by 10, to give you a perspective of it's size.


I first of all cut out several sizes of circles using my circle cutter, removing the top layer of paper to reveal the corrugation and sealing with a coat of black Gesso.


Next stage was to dab some Forest Moss distress paint on and dry. Followed by spritzing on my stains building up shades and layers of colour and drying with my heat gun. Once I was happy with the shade I sprinkled Frantage around the edges heating from behind until it had melted.


I then cut out more circles in white cardstock- I used Sheena's.  Placing in a cat litter tray I bought to use as my spray booth. This is a good way to not waste too much inks, as they don't soak into the plastic and re activate with a spritz of water. I started building up my layers of colours.


I also pressed into areas of ink pooled in my tray.


Next, I separated my bird napkin from its layers and tore close to my images. Tearing is better than cutting as your edges tend to disappear when you apply onto your background.


I used various stamps and Archival Ink on my background circles to build up more layers and distressed the edges with ink. I also kept checking where my birds were roughly going to be positioned so I didn't stamp too much in these areas. Once happy I applied Multi Medium Matte onto my cardstock pressing my birds in place.  I then went over the whole area of card with Multi Medium to seal.


I decided I want to add some more detail for finishing touches, so gradually worked around the edges pressing them into my Versamark embossing ink pad and adding Stampendous Pearlustre in Champagne. I also added small areas of scattered embossing powder onto my pictures.


I also added some remnant rubs.


Next I added small areas of Rock Candy Crackle paint and let it dry, followed by a little Brushed Corduroy distress rubbed into the crackles.


I started to now glue my backgrounds to my images and the layers of brown paper I peeled off my corrugated card earlier, I glued to the back for a neater finish. I arranged all my images and used hot glue to put together, to make my picture. Adding a couple of plate hangers and an old chain from a necklace to make hanging on the wall easier.

  
Finally, my berries all were given 2 layers of Glossy accents for added dimension and interest.


This is it pictured hanging on my kitchen wall.

I hope you like my wall hanging and I have managed to inspire you to join in the challenge at A Vintage Journey. You could also be the lucky winner of a £10 shopping spree with our generous sponsor Country ViewCrafts, where you will find lots of Tim's goodies with free P & P.

Happy Thanksgiving to all my American friends and have a great weekend to all my fellow bloggers,

Julie xx


Monday 24 November 2014

Christmas Gift Box - Craft Hoarders

Click to Enlarge

Hi Everyone, Today I am sharing my second post of the month with Craft Hoarders Anonymous. Their challenge this time is called Box It Up. In the description it explains you can make or alter a box as long as you dig deep in to you stash of supplies.


I have made this style of box before so, so if you would like to see how to construct it please look here.


This gift box I used dies and colours of card stock with a Christmas feel adding stickles for some sparkle. My box has been decorated inside and out.


On the underside of my lid I added a large glittered snowflake and a sentiment.

I paper pieced my leaves mesh border to form a decorative strip around the centre of my box.


My Poinsettia I added a little glitter to the edges and a Christmas sentiment ticket.

Please have a look over at Craft Hoarders Anonymous where you will see lots of inspiration and full details for this challenge.

Thanks to Gloria and her Design Team for giving me the opportunity to share my post on their challenge blog, it's been a real pleasure. Good luck to everyone entering Box it Up.

Happy Crafting,

Julie x

Cheery Lynn Dies used :

Saturday 22 November 2014

Especially for You - Tag

Click to Enlarge

Hi Everyone, I decided to join in the fun of the challenge at Cheery Lynn Designs this week and make a tag for my DT post. I had full intentions of it being Festive in style, but it was such a horrible day outside I decided to think of summer days.


I cut a piece of Cardstock into a tag shape measuring 3.5 by 8 inches. I mounted my pink striped paper onto it which was distressed at the edges with my distress tool, to give a shabby feel.  I cut out my Deco Border in pink and white paper and offset one in front of the other to give added dimension.


I cut sections of my Snowflake Doily and placed on my tag for interest and texture. Next layering my fanciful flourishes on top.


My flowers were cut out in white card. I dabbed a little distress into the middle area of the flowers for shading and added flower soft for texture into the centres to finish them.


My speech bubble is from the Latest Release. The die is called Say What and has many shaped bubbles which are so much fun to use. I stamped a sentiment onto it and added distress ink around the edges.


My doll stamp was coloured with Copics and her dress was stamped on patterned paper and layered up. Finally adding a ribbon and some bling for finishing touches.

Hope you have a lovely creative weekend,


Julie x

Shop at Cheery Lynn For :


Saturday 15 November 2014

Birthday Card

Click to Enlarge

Hi Everyone, I hope you have all had a creative week of crafting.
This week for my Cheery Lynn Designs DT card I am showcasing their new release die Vienna Waltz which comes in a set of 3. I have made a card which is a simplistic design, but with the detail of the dies it gives a beautiful ornate look.

The Vienna Waltz dies are designed to inter-link with our Circle Classic dies. Should you decide to combine them together you can layer a perfect match to the front or behind, as I did on this card.

You will see I cut out plain cardstock using the circles to make my ornate details pop on the white card and also cut my floral paper nesting it neatly into the centres on the front. I cut my die in half and placed it at either side.


My centre die is using the next size down in the Vienna Waltz collection, layering coloured card behind again to show the die cut off. My Happy Birthday has been layered with 2 shades of card for a shadow effect. Stickles and a little bling added onto the centre die to finish.


Thanks for stopping by today and I'll see you all soon. 

Julie x

Shop at Cheery Lynn for :


Friday 14 November 2014

#19 All Sewn Up - A Vintage Journey

Click to Enlarge

Hello my fellow blog friends, thanks for stopping by to see my DT post for A Vintage Journey.

Brenda is hosting our latest challenge which runs for 2 weeks called All Sewn Up. Do pop over, here, where you will find all the details on how to enter the challenge and see the outstanding inspiration from my fellow Creative Guides. You are once again in for a real treat.

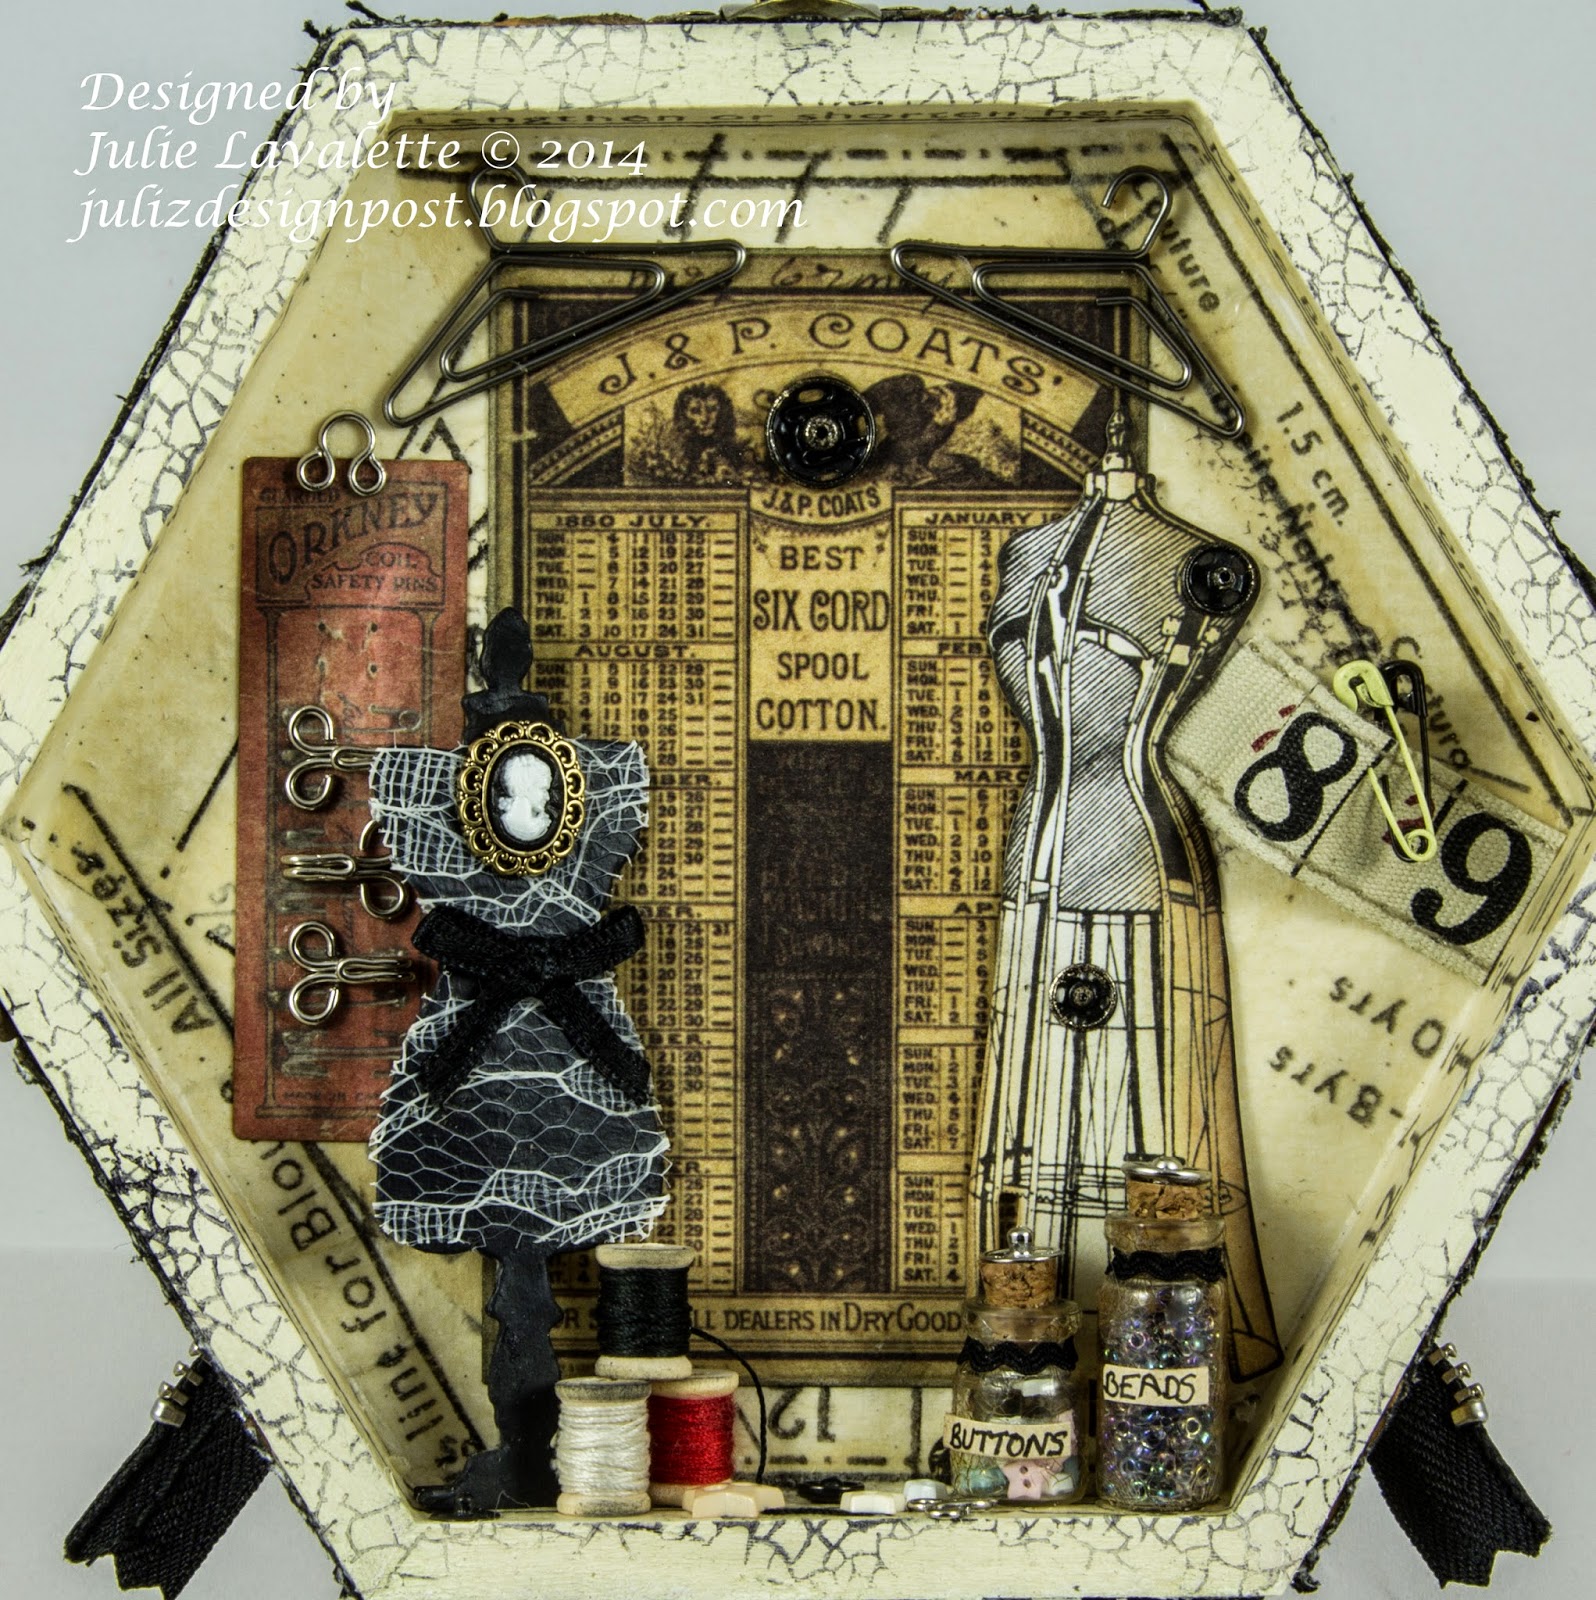
I decided I wanted to make a sewing box for my daughter, adding eclectic touches as she loves this in her style of jewellery. She is now in London training for British Airways long haul Cabin Crew. On previous uniforms she has worn, buttons would fall off regularly, so I thought this would be a nice gift to give her, should she need a needle and thread at hand.

My inspiration was taken from Tim's papers and the blog post he shared with us all recently about his new fabrics and beautiful patchwork projects. Also his saying of  'embrace imperfection', suited my project perfectly as I wanted my stitching and zip to have a lack of straight lines.


With this all in mind I started by removing the fastenings from the front and then giving my box a light sand and a coat of Gesso to seal it.


I then started tearing tissue from an old sewing pattern and gluing onto my box in areas inside and out with Multi Medium, that I thought at this point I may keep on show.  I added a little crackles with my stamp and Archival ink.


Next I cut out sections of different papers from the Menagerie Collection to fit in all the squares as a patchwork effect. I stitched them using my sewing machine, changing from Zig Zag, to not so Straight a stitch Lol. I then used my distress tool around all the edges and inked for definition. My paper now looks like torn pieces of fabric with a hint of the sewing pattern in the background. 


I then glued them onto my box.


On the inside of the box I decided to add a little decoration to the lid with the Ephemera Pack Thrift Shop, also using the Sizzix mini sewing room die, dressing my mannequin with a lace overlay, ribbon and an old Cameo earring. My bottles I applied the crackle technique found in Tim's new book along with small hand written labels. You will also notice bobbins of thread, inch tape, buttons, hooks and eyes.


On the outside of the lid I had the perfect paper in my Tim Stash ( French Industrial ) with all the little squares. I roughly cut out an area for the zip to go not worrying about it being precise (embrace imperfection). Next I stitched along all the lines to give the illusion my paper had been patchworked together and stitched my zip in place, again using my distress tool and inks around the edges of the paper.


On this paper of Tim's I loved how this Lady looked like Cabin Crew staff from the Sixties so I had to incorporate her into my design. This is when I had the idea of having my zip open on the top of my box.


I carried on decorating the top with some appropriate word stamps, a few remnant rubs, Tim's inch tape and buckle and some stud fasteners. You will also notice my Aeroplane button which I gave distressed around the edges and gave a coat of glossy accents.


To finish I added a layer of black felt to the base of the box inside and out.


Front and Rear view


I hope I have managed to inspire you to join in the challenge now at A Vintage Journey, it would be lovely to see your entry. You could also be the lucky winner of a £10 Shopping Spree with our generous sponsor Country View Crafts, where you will find lots of Tim's goodies with free P & P.

Happy Crafting,

Julie x


Monday 10 November 2014

Thank You Gift Card


Hi Everyone, thanks for your continued support with comments especially with me running behind with all your lovely blogs. Today, I am delighted to be sharing my post as a Guest Designer at Craft Hoarders Anonymous after my win with my Cherub Keepsake Box here.
The challenge is 'For all that you do,Thank you'. It describes to make a Thank you gift for this challenge, a hostess gift or a simple thank you card.


My mum asked me around the same time to make a Thank you card for her friend she had stayed with recently in Finland. She explained to me she adored the vintage style, lace, pearls and a very ornate look. I decided to make an easel card and inside the little gift box I placed some Post - it notes. This way she could have it on display and always know where to get a bit paper if needed.


My image is from Pion and my papers are all Maja.


My box I made using my Scorpal board. Sorry I can't show you inside, I realised I didn't have this photo and it is now in Finland.


My die cuts are all Cheery Lynn and the lace is from my craft stash.

Please pop over to Craft Hoarders Anonymous to see the talented Design Team's post of inspiration for this challenge which started last week and you will also see a variety of Guest Designers posting at the same time as myself. Good luck to everyone entering their challenge.


Julie x

Cheery Lynn dies used:


LinkWithin

Related Posts Plugin for WordPress, Blogger...
01 09 10